There are many reasons to try and minimize the sounds coming from a bathroom, aside from the obvious, there are some people that like to sing or listen to extremely loud music while in the shower.
But all the noises generated in the bathroom should, ideally, have a harder time getting out.
For some reason, bathrooms aren’t already being built in a soundproof manner, which they should, but luckily there are a couple of steps you can take in order to keep the noises inside.
Important note: Most of what I will teach you in this guide can be done in an affordable manner, but maybe your bathroom has very thin walls and you need to install drywall, and this will definitely be much more expensive, so take that into consideration.
Now, there is one hugely important point that I need to make before we go any further, since this is where many people get confused:
Table of Contents
Soundproofing vs Acoustic Treatment
Soundproofing consists in blocking sound, not letting it in or out of a room, and this is done by installing materials that block or reflect sound, rather than absorb it.
Acoustic treatment consists in absorbing the soundwaves inside of the room by installing materials that can do that, like acoustic panels, and this will reduce the room’s natural echo or reverb.
When soundproofing a bathroom we’re mostly worried about not letting noise leave the room, which means that we need to use materials that can block it.
Still, sound absorption does help a little, but if you only place a rug on the bathroom’s floor and hang one or two acoustic panels, everyone outside of the bathroom will still be able to hear you since the only thing you managed is to have less echo in the bathroom itself.
You can learn more about the differences between soundproofing and acoustic treatment here.
Now, let’s get into the guide!
How to Soundproof a Bathroom
You will need to start by soundproofing the bathroom door by applying weatherstripping tape, a floor sweep, and caulking any cracks that might have formed between the frame and the wall. After doing this you can move on to the windows and the walls, but the door is definitely the most important factor you need to deal with.
There are many other steps you could take, but I’d highly recommend properly soundproofing the door and checking the results.
Of course, if you have a window that connects the bathroom to the house, soundproofing it will be equally as important as the door, but this isn’t as common.
1. How to soundproof the Bathroom Door?

Soundproofing is all about sealing every single gap or crack where sound might be allowed to get in- or out, since no matter how small the gap, it will still be able to get through. Soundproofing a door can be done in about 15 minutes and for very cheap, and the results will be very noticeable.
One tip to check if the door is properly sealed is to have someone stand on the other side of the door (with the door closed) using a flashlight to light all around the frame. You, from the other side of the door, shouldn’t see any light get through if it’s sealed properly.
If you can see certain spots where light comes through, work on those until they are sealed.
Steps to soundproofing a door;
- Weatherstrip the door: Weatherstripping tape is by far the best tool to create an air-right seal between the door and the frame.
- Use Acoustic Caulk: While not as important, acoustic caulk can help you seal off any gaps that might have formed over the years between the frame and the wall.
- Install a Door Sweep: A door sweep will cover up the gap left between the floor and the door.
- Use Acoustic Blankets: Hanging an acoustic blanket on the door might help by adding an additional barrier, especially if the door is thin.
While doing these things should already provide a drastic improvement, if you want to soundproof the door even further then read my post on how to properly soundproof a door.
Important Note: Some bathrooms have Sliding Doors, and the way to soundproof those is quite different, so here’s a guide on how to soundproof those.
2. How to Soundproof the Bathroom Windows?
Glass isn’t particularly known for its insulation capabilities, which means that windows are definitely a place that you will need to work on to soundproof the bathroom, especially if they connect it to the house, which isn’t that normal but I’ve seen it happen.
The process of soundproofing the windows is almost identical to the one of the doors, but if you want a full guide on how to do it, here is my guide on how to soundproof windows.
Steps to Soundproofing a Window
- Use a Weatherstrip: Same concept applies here; attach the weatherstrip to the frame and this should create an air-tight seal when closing the window.
- Use Acoustic Caulk: If there’s a small gap between the frame and the wall, which tends to happen on older windows, use caulk to seal them.
- Install Acoustic Curtains: Hanging good-quality acoustic curtains will absorb some of the sound.
- Use Moving Blankets: Moving blankets are great sound absorbers and they are easy to install.
There is a lot more to it and if you really want to soundproof your windows properly, then check out the post I linked earlier, but as long as you weatherstrip the windows and cover them up with a really thick material, you should be set.
In my window soundproofing guide you’ll see that I recommend using window plugs or window inserts, but I wouldn’t recommend them in this case since bathrooms need to be ventilated and these plugs would need to be removed and re-installed every time. Curtains are just easier.
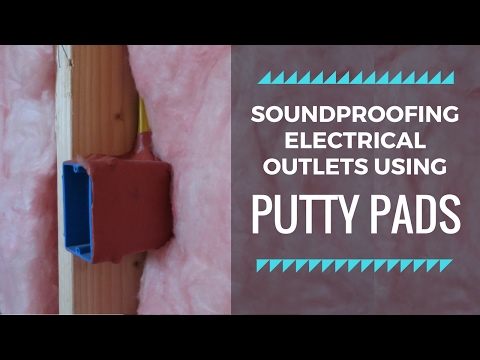
3. Soundproof the Electrical Outlets
You might be wondering why I’m even mentioning this, since one wouldn’t immediately think of outlets being the culprit of poor sound insulation, but they definitely can let noises out of the bathroom, and without much difficulty either.
Steps to Soundproofing an Electrical Outlet
- Use an Outlet Seal: These rubber seals go between the plate and the electrical box and will prevent both sound and air-drafts.
- Acoustic Putty: Acoustic Putty can be used to soundproof odd shaped, such as electrical boxes.
- Use Acoustic Caulk: You could also use acoustic caulk between the plate and the electrical box/wall to create a righter seal.
Another alternative would be to get an weatherproof electrical outlet cover, but this could interfere with the aesthetics of the bathroom.
4. Soundproof the Walls
If the walls are poorly insulated, maybe because when the house was built they didn’t pay too much attention to this, then you may have to do something about this yourself.
This step I would only recommend you do if you know what you’re doing, or if you hire a professional since it could end up costing a fortune.
Add an Extra layer of Drywall
While it may be quite expensive and time-consuming to add some drywall to your existing walls in order to add another barrier that sound would need to go through, it might be the best way to really deal with the issue in some cases.
Drywall will act as an additional barrier, and this reduces the amount of noise that is allowed to leave the room drastically, and as far as soundproofing goes, installing materials that block sound instead of absorbing it, like acoustic panels would, is the best way to do it.
One additional thing you might consider doing is adding some soundproofing compound to the back of the drywall to block sound even further.
Note: Use acoustic caulk to seal the gaps left between the sheets of drywall.
5. Soundproof the Bathroom Fan
Bathroom fans can be loud, and since you typically leave it on after leaving the bathroom, if it’s a really loud one, it can be quite annoying to hear it throughout your entire apartment.
Plus, you don’t want people to know the fan is on… right?
Fans are usually loud, but the reason you can hear them in other places of your home is mostly because of the vibration that they generate are allowed to spread through the structures of your home with ease.
The way to address this issue is by installing rubber-like materials that come in contact with the fan’s motor in order to absorb those vibrations and stop them from spreading.
Sorbothane is the anti-vibration material I’d recommend for this task.
Note: Pay special attention not to cover any holes on the fan’s motor since it could overheat and break.
Steps to soundproofing the bathroom fan;
Note: It might be a safe idea to cut the power to do this.
- Step 1: Remove the Fan from the wall.
- Step 2: Cover the housing with Sorbothane without covering any ventilation holes.
- Step 3: Re-install the fan.
6. Consider sound absorbing materials
I mentioned in the beginning that sound absorption isn’t as good for soundproofing as materials that block sound, but it can help a bit, especially when combined with all the other steps I mentioned.
For a material to be good at absorbing sound it needs to be thick and dense. So, here are a couple you could use;
Acoustic Blankets
I mentioned Acoustic Blankets earlier, but they are definitely one of the best- and most affordable items one could use to deal with unwanted noises since they are cheap and easy to install.
Hanging them on the door, windows, or walls will have a big impact on how much noise is allowed to leave the bathroom.
Acoustic Curtains
While not as versatile as acoustic blankets, acoustic curtains have the advantage of dressing the room and of letting you close them when you need to, and then open them back up again once you open the window for ventilation.
Here’s an entire post where I talk about soundproofing curtains, if they work, which ones to get, etc.
Thick Rugs
Now, I personally don’t like rugs in my bathroom because they can get wet, etc., but they can help absorb some sound.
The thicker the rug the better, at least in this case. Here’s an example of one you could use.
Acoustic Panels
Of all the alternatives on this list, I consider acoustic panels to be the worst, let me exaplin;
In most cases, they don’t look too pretty, unless you make them yourself and hang them as decoration, but they can also be quite expensive, and considering that they won’t do too much to reduce the amount of sound that is allowed to leave the bathroom, I don’t think that they are worth it.
One cool trick you can use it to hang a painting and use it as an acoustic panel.
Paintings on their own already absorb a little bit of sound, BUT you could get some old towels and carefully place them behind the painting, inside the frame.
How to do it?
- Cut a couple of old towels so that they fit perfectly inside of the frame.
- Stack them all on top of each other and place them on top of a bigger towel and sew the together.
- Staple the bigger towel on to the frame of the painting and then cut off the excess fabric.
7. Use Soundproofing Paint
While soundproofing paint might be considered a gimmick by some, if you’re already thinking about painting your bathroom, why not do it using paint that was designed to block sound?
Even if it only works slightly, it’s better than nothing, plus it doesn’t cost much more than regular paint and you won’t even notice a difference when looking at it.
8. Soundproof the Toilet
Flushing a toilet announces to everyone that you’ve been using it, so I understand if you would like to lower the noise it makes and maintain your privacy.
Another annoying noise is the one the lid makes when opened or closed, since it hits the tank on the way up, and the toilet on the way down.
Here are the two solutions;
Lower the Flushing Noise
You will need to purchase this adhesive foam tape and follow these steps;
- Take the lid off the tank and clean the top and the inside edges of it. Also clean the inner edges of the lid.
- Peel the adhesive backing off the tape and stick it around the top edges of the tank while folding it inside the wall, making sure to apply it to the entirety of the top edges, no gaps should be left open.
- Put the lid back into place. It should be a tighter fit now because of the tape.
Add Padding
To lower the noise the lid makes when bumping against the tank you can do two things;
Get a toilet lid cover or simply install these noise-dampening bumpers instead.
Both options are very affordable and also effective.
9. Soundproof the Bathroom’s Sink
Now, this may require a bit of work, but it can help, especially if the sink is made of steel.
You will need to get a regular Sound Deadening mat; one with an adhesive backing would be best.
Note: This mat will be adhered to the bottom of the sink.
Steps to soundproofing a Bathroom Sink;
- Cut the sound deadening mat into pieces that will fit on the bottom side of the sink.
- Cover as much surface as possible.
- Done.
What are the most important steps to follow?
If you soundproof the door, you will have dealt with 90% of the issues, in most cases.
If your bathroom has doors that connect to the house, then soundproof those as well, especially if they are old.
Installing sound absorbing materials, like acoustic blankets, will also help quite a bit, but make sure to soundproof the door and the windows first by using weatherstripping tape, acoustic caulk, etc.
Lastly, I wouldn’t worry too much about the walls since installing drywall, etc. will be too much of a hassle.
Conclusion
People tend to be loud in the bathroom, be it singing or listening to music while in the shower or while doing their business.
Whatever the reason behind the noise, you can always find ways to lower it quite a bit.
I’d start with the door, then the windows, maybe look at the electrical outlets, and install some sound absorbing materials.
I hope this was useful!
Last Updated on May 11, 2022 by Facundo