
There is nothing more frustrating than being on the road and not being able to have a nice conversation with someone or listening to music because the noise your car is too overpowering.
And this is why in this post I will give you some pointers on how to soundproof your car, be it from engine-, road- or wind noises.
All the tips I share with you will help a LOT with the reduction of noise, and I mean a LOT. It’s definitely worth doing.
Table of Contents
How to soundproof a car?
Soundproofing a car comes down to how well you manage to isolate the cabin from the vibrations generated on the road, and the best way to achieve this is by installing soundproofing floor mats on the floor and on the inner part of the doors.
By doing this you can expect anywhere from a 15% to 50% improvement.
Now, let’s get straight into the guide.
1. Using Soundproofing Floor Mats to reduce Road Noise

The best way by far, in my opinion, is to install a floor mat.
This is a sound deadening material that is extremely easy to install, and it only takes between 30 min to one hour to do.
Dynamat, which is the best-known brand of floor mats, is a fantastic choice because of two reasons; For how much it reduces the external noise and also for how quickly anyone can install it.
Dynamat, however, is quite expensive and what’s the point in spending more if you don’t need to?
There are other manufacturers who also sell similar sound deadening mats for almost half the price while still conserving the same quality.
The Noico sound dampening mats are the ones I recommend the most, you can’t go wrong for that price.
Be careful not to get the ones made with asphalt since I heard a lot of people complain about them melting in hot weather.
How to install a sound deadening floor mat?
First you need to take out the car’s floor mats.
Next, you simply install the floor mat, be it dynamat, Noico, etc., which has one adhesive side that makes the installation super fast.
I’d suggest also applying it to the floor on the back and the trunk. You may not realize this but if you have a large trunk area the noise from the rear wheels will come straight into the car’s cabin .
Using sound deadening mats to cover up the whole of the trunks floor will make a huge difference.

How much insulation can you expect?
This all depends on how naturally loud your car is, you will never be able to remove a 100% of the outside noise. But believe me, this method will make a huge difference.
Another factor to consider is how much of the cars surface you cover with the sound deadening mat.
If you only apply it to the floor in the front of the car, you will get a significant noise reduction, but there is still a lot more surface you could cover.
Note: If the trunk of your car is really small, then applying the insulation mat won’t really be of much use. It will still help, but the difference will be hardly noticeable.
As far as how much noise reduction you could expect, if you cover close to 100% of the surface and if the car is pretty loud to begin with, I’d say about a 50% reduction in noise.
Of course, if you already have an extremely quiet car, the difference won’t be as noticeable.
2. Using soundproof Mats AND Reflective Insulation
If the previous method alone didn’t reduce the noise level as much as you’d like, then you could also use Reflective insulation.
Apart from helping with noise reduction, reflective insulation is great at blocking both the heat and the cold coming from the floor of the car.
The one reflective insulation mat I would recommend is this one Amazon, you won’t find any bad reviews about it plus the price is very affordable.
How and where to apply it?
The great thing about reflective insulation is that it can be used simultaneously with soundproof mats, in fact, they are meant to be used together.
Reflective insulation has to be under the soundproofing floor mat.
You need to use an Adhesive spray on the car’s floor and place the reflective insulation on top of it. After it dries, you can apply the Soundproofing Mat on top of it (remember that the mat comes with an adhesive side so there’s no glue or spray needed).
Now, even though this method is better overall, I don’t think that most people will benefit from installing both the floor mats and the reflective mat, and this is mainly due to price-effectiveness.
Floor mats on their own will already soundproof a lot, the reflective insulation is just an added bonus. So, if you’re on a budget, only go with the floor mats.
3. Insulate the Car Doors
The first step is to remove any panels that cover up the door, the goal here is to gain access to the inside of the door.
You will also want to remove the speaker.
You will notice that most doors are completely hollow, just an empty cavity inside. This doesn’t provide any noise insulation whatsoever and in fact may even amplify sound.
The last step is to use Rubbing alcohol to clean every surface of the door to remove grease and oil to better help the sound deadening material to stick to the door.
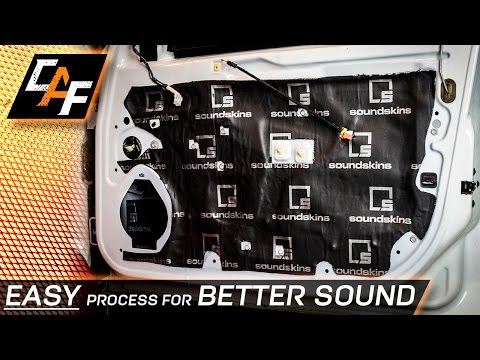
Next you need to apply the insulation material. The two I recommend are these Soundskin acoustic foams, or if you’d like you could use the same mats used in the first step.
Basically, you just need something that is good at absorbing vibrations.
How to apply the insulation foam to the car’s door?
Start by cutting up a couple of pieces into squares and remove the protective backing.
Next, use its adhesive side to apply it to the inside (inner side of the outer sheet) of the door.
Now that you have applied the material to the inner side of the outer sheet of the door, it’s time to work on the inner side of the door (if this sounds confusing watch the video that’s a bit further down).
Important note: The most important part of the door that should be insulated is the outer sheet, which is also the most difficult one to cover.
So, take your time, cut the foam in such a way that it will fit into every space that is still uncovered, and then move to the next step, which is the inner side of the door.
Here I would recommend just using one big piece of the material to insulate the inner side. This is easier than having to cut lots of small pieces and adhering them to the door, plus it’s actually better.
You could place a cardboard against the inner side of the door and using a pencil trace the whole surface you want to apply insulation to.
Make sure to leave room for any moving parts, such as the lock, and for the screw holes.
Next, cut the cardboard and use it to transfer the shape to the Soundskins/insulation foam.
Once you cut it, remove the protective backing and adhere it to the door and you’re done.
Soundproof the car’s Roof
While not as important as soundproofing the floor, the car’s roof is a large piece of metal that vibrates quite a lot while the car is moving.
Not only that, but by soundproofing the roof you will also notice a dramatic difference during rainy days.
Now, what material should you use?
Any of the materials I listed above should do the trick, but I recommend one with a peel-and-stick backing for easier installation.
How to install it?
well, to access the car’s roof you will need to remove the cloth headliner, and please be careful while doing this since you don’t want it to get damaged.
Next, using rubbing alcohol clean the entirety of the roof’s surface. This will help the sound deadener to better stick to the roof.
Now, as far as how to install it, I’d recommend using large pieces of the material to cover up as much of the roof’s surface as possible, and then simply measure and cut smaller pieces to fit into the areas that still need to be covered up.
5. Reduce Wind Noise in your Car
Now, feeling the noise of the road is something that depends entirely on how the vehicle was manufactured, since it will depend on how much isolation they put in while making it.
However, you will usually start to hear wind noises once the rubber seals around the windows and doors start deteriorating.
All you need to do here is replace them, which is quite easy, just follow these steps…
Remove the old ones
Note: You should do this with an open door, it makes the whole process easier.
Locate the spot where the seals are damaged and using a screwdriver, very gently move it along to separate the rubber from the metal.
Once it’s loose enough, you should be able to peel it off easily.
Clean thoroughly
The next step is to clean everything with a solvent to remove any residue of rubber and adhesive.
After you’ve done this let everything dry for a bit.
Use Sandpaper
The next step is to sand the metal so that the new adhesive can stick properly.
Note: Be very careful while doing this. Use a very fine-grit sandpaper and only sand where the rubber was, don’t go anywhere beyond where the seals were.
Apply the new adhesive
Apply the weather stripping adhesive exactly where the seals will sit. Make sure to check properly before doing this since you don’t want to apply glue anywhere else.
Lastly, put a bit of glue inside the rubber itself.
Make sure to give it a couple of minutes before the final step, since the adhesive needs about 10 min to work properly.
Put the seals in place
The final step is to put the seals in place, press down firmly on them to make sure that they bond properly.
6. Where should you prioritize insulating first?
First you should cover every one of the big surfaces since these are the ones that will generate the highest amount of unwanted noise.
The most important place by far is under the diver’s and passenger’s floor mats and seats. This is because it’s where you’re going to be 99% of the time when you are in your car.
It’s also the most important part of the car to soundproof since the floor panels of the car act like a huge sound diaphragm, and all the vibrations of the road will resonate throughout the cabin.
Once you’re done with that step, you should move on to insulating the trunk (if it’s a big one).
Like I mentioned earlier, if your car has a big flat trunk with no seats, you should absolutely cover it with a soundproofing mat. This is essential since the trunk will also act as a sound diaphragm for all the vibrations of the road.
The third area you should focus on are the doors. This takes a bit more work than any of the other areas in the car since you have to take the doors apart and reassemble them later on, but it’s well worth it.
The last place, and least important, is under the floor mats of the back seats. Still, even though there are no axles or wheels underneath this part of the car, it still acts like a large diaphragm.
I don’t think the window seals are as crucial as any of the other steps, but you should check them to see if they are torn or broken.
7. Cover as much surface as possible
Applying a little soundproofing foam here and there “can” help a bit, but you should really focus on covering every nook and cranny.
Why is this important?
The way sound works, is that it can squeeze through any opening or hole, no matter how small, and even though reducing the size- or the number of places where sound can get in, it will still be able to get through.
This is why it’s extremely important to cover as much of the car’s surface as possible.
Now, luckily we’re not talking about regular soundproofing, since in this case it’s mostly about reducing vibrations, and some small pieces of the floor mats will already absorb quite a lot.
But if you really want to change the way the car feels when you’re driving it, cover as much surface as you can.
Therefore, it’s really important that besides covering up every little hole you can find, you also make sure to not leave any gaps between the pieces of soundproofing foam/mats you use. That’s why I recommend to use one big piece for the doors instead of using a lot of small ones.
8. Change the Tires
Now, I’m all about keeping the budget as low as possible, and this step is one that I personally wouldn’t go though while soundproofing my car since it dramatically increases the price, but changing the tires can have a major effect on the transfer of noise from the road to the cabin.
Make sure to check the noise rating on the tires you have and/or the ones that you will be installing on the car, since most manufacturers include this information.
But you should be looking at two things; Width and Thickness.
The wider the Tires, the more in contact they will be with the ground, and this will transfer more sound to the cabin.
If the tires are too thin, they will naturally absorb less vibration since the rubber naturally acts as a vibration dampener.
Can the Car’s Engine Noise be reduced as well inside of the cabin?
Now, since the engine is separated from the cabin by the Firewall, one could assume that this surface should be soundproofed in order to lower the amount of noise getting from the engine into the cabin, right?
The issue here is that it’s nearly impossible to access it without taking apart half of the car’s cabin, but you may want to install sound deadening mats under the dashboard and behind the glove compartment to at least get some noise reduction.
Other than that, I’d recommend taking the car to a mechanic to do this properly.
How much does all of this really reduce noise?
You’d be surprised about how effective all of these methods are. The louder your car is, the easier it will be to notice a difference.
If your car is already silent, you probably won’t notice more than a 15% improvement.
But if you drive an old one with bad sound insulation, then I expect to see up to a 50% improvement.
Try the ones you feel will benefit you the most, I’m certain it will help you out a lot.
Just remember to cover as much of the car’s surface as possible.
Last Updated on March 3, 2021 by Facundo